
The files for this tutorial are available on github.com/ac2cz/SDR
In the previous tutorials we have read data from a soundcard or something that looks like a sound card - e.g. a wav file or a device like the Funcube Dongle. If you missed that excitement then go back and do them because this Tutorial builds on Tutorial 8 and Tutorial P. In this tutorial we are going to consider a device that reads IQ data through the USB bulk interface and that needs configuration set or values tweaked through USB commands. This tutorial will use an inexpensive R820T RTL-SDR dongle to demonstrate how to do that from Java. Let's start with interfacing to USB devices and then work on processing the data in part 2.
Before we get too far into this, I assume you have installed the correct drivers for the RTL-SDR. If you have not, then go over to rtl-sdr.com. Make sure the RTL-SDR is working with SDR# or another program.
Interfacing with USB devices is a bit messy because we are working directly with the hardware. That breaks Java's vision of write once, run anywhere. If we just want our program to run on a single platform then we could grab a suitable library and make the necessary API calls to the hardware. But if we want the program to run on multiple platforms we need a cross platform USB library and a set of Java APIs for our device. We will use the Java implementation of libusb, called usb4java. Start by downloading the usb4java library. Grab usb4java and usb4java-javax.
In your IDE add the usb4java jar file. I have downloaded version 1.30 so it is usb4java-1.30.jar. You also need the jar file for the platform that you are on. This is where it becomes apparent that somewhere in the API call it works out the platform you are on and calls the necessary platform specific code. So I added libusb4java-1.3.0-win32-x86-64.jar. If you later package your application up as a Jar file for use on other platforms then you would add all of the platform specific libraries. The correct one is picked at runtime. You need to add the Apache commons library too, which is included in the download, likely for logging.
The first test we will run is to find and open the USB device. We start by initializing Libusb with LibUsb.init(null). It might seem odd that we pass null. We could instead pass a context, which is a structure representing a LibUsb session. If we want to have more than one USB connection at a time then that is important. If we only have one connection then we can ignore the context and use what is called the default context. In that case we pass null whenever the context is needed. Also note that LibUsb is a C library and we are calling underlying APIs in the platform specific library. So they won't always look and behave like Java objects.
Having initialized the Library we create a DeviceList and then call LibUsb.getDeviceList() to populate it. The code is below, showing how we can iterate over the device list and print out the devices we find.
	public static void main(String[] args) {
		int result = LibUsb.init(null);
		if (result != LibUsb.SUCCESS) throw new LibUsbException("Unable to initialize libusb.", result);

		// Read the USB device list
	    DeviceList list = new DeviceList();
	    result = LibUsb.getDeviceList(null, list);
	    if (result < 0) throw new LibUsbException("Unable to get device list", result);

	    try {
	        // Iterate over all devices and scan for the right one
	        for (Device device: list)
	        {
	            DeviceDescriptor descriptor = new DeviceDescriptor();
	            result = LibUsb.getDeviceDescriptor(device, descriptor);
	            if (result != LibUsb.SUCCESS) throw new LibUsbException("Unable to read device descriptor", result);

            	System.out.println(descriptor);
	        }
	    }
	    finally {
	        // Ensure the allocated device list is freed
	    	// Note that we need to not free ths list before we have opened the device that we want, otherwise that fails
	        LibUsb.freeDeviceList(list, true);
	    }
	}
That will print out quite a lot of stuff. Each USB device has an entry like the below. Note there is a 4 digit hex vendor id and a 4 digit hex product id for each. If you have the RTL-SDR plugged in then one of the entries should look like the below. Your RTL-SDR may not have the same vendor and product ids, but that is what mine returns.
Device Descriptor:
  bLength                 18
  bDescriptorType          1
  bcdUSB                2.00
  bDeviceClass             0 Per Interface
  bDeviceSubClass          0
  bDeviceProtocol          0
  bMaxPacketSize0         64
  idVendor            0x0bda
  idProduct           0x2838
  bcdDevice             1.00
  iManufacturer            1
  iProduct                 2
  iSerial                  3
  bNumConfigurations       1
Using this information we are able to identify and then open a specific device by searching for its vendor and product id.
So let's put that code in a UsbDevice class to hold the connection to the USB device.
public class UsbDevice {
	public Device device;
	public DeviceDescriptor deviceDescriptor;
	DeviceHandle rtl;

	public UsbDevice(short vendorId, short productId) {
		// Initialize the default context
		int result = LibUsb.init(null);
		if (result != LibUsb.SUCCESS) throw new LibUsbException("Unable to initialize libusb.", result);

		rtl = findDevice(vendorId, productId);
		if (rtl == null) throw new DeviceException("RTL not available,  is it plugged in?  Does it have the updated drivers?");
	}

	public void exit() {
		LibUsb.exit(null);
	}

	DeviceHandle findDevice(short vendorId, short productId) {
		// Read the USB device list
		DeviceList list = new DeviceList();
		int result = LibUsb.getDeviceList(null, list);
		if (result < 0) throw new LibUsbException("Unable to get device list", result);

		try {
			// Iterate over all devices and scan for the right one
			for (Device device: list) {
				DeviceDescriptor descriptor = new DeviceDescriptor();

				result = LibUsb.getDeviceDescriptor(device, descriptor);
				if (result != LibUsb.SUCCESS) throw new LibUsbException("Unable to read device descriptor", result);
				if (descriptor.idVendor() == vendorId && descriptor.idProduct() == productId) {
					System.out.println(descriptor);
					this.device = device;
					this.deviceDescriptor = descriptor;
	            	deviceHandle = new DeviceHandle();
	        		result = LibUsb.open(device, deviceHandle);
	        		if (result != LibUsb.SUCCESS) throw new LibUsbException("Unable to open USB device", result);
	            	return deviceHandle;
				}
			}
		}
		finally {
			// Ensure the allocated device list is freed
			// Note that we need to not free ths list before we have opened the device that we want, otherwise that fails
			LibUsb.freeDeviceList(list, true);
		}
		return null;
	}
}
Now we can run a single line in our main method to test this. It should print out just the descriptor for that device:
	UsbDevice usb = new UsbDevice((short)0x0bda,(short)0x2838);

	// do something with USB

	usb.exit();
The LibUsb device handle we obtain from opening the device gives us a way to communicate with it. A device has one or more interfaces and each interface has one or more communication channels called endpoints. All of this is described in a set of Configurations. We don't need to know too much about this, but let's print it out to see what is there. We can see from the device descriptor that our RTL-SDR has one set of configurations because bNumConfigurations is 1. We can print the configuration description by adding the below code to findDevice(). Note that we pass 0 into getConfigDescriptor because we want the first Configuration. If there were multiple configurations we would increase that number. The result is returned in config, so we print that out.
	ConfigDescriptor config = new ConfigDescriptor();
	result = LibUsb.getConfigDescriptor(device, (byte) 0, config);
	if (result != LibUsb.SUCCESS) throw new LibUsbException("Unable to read config descriptor", result);
	System.out.println(config);
That gives quite a lot of information. As I said, we don't need to know too much about this, so just read this out of interest. The printout shows that we have two interfaces and that one of them has an endpoint. The endpoint is described as:
	bEndpointAddress      0x81  EP 1 IN
	bmAttributes             2
    Transfer Type             Bulk
    Synch Type                None
    Usage Type                Data
  wMaxPacketSize         512
That is the bulk interface for the IQ data that we want. The other interface is the control interface. This interface is used to setup and control the device.
If you want to know more about how to access and program USB Devices with LibUSB, have a look at the libUsb documentation. It applies to the C Library, but note that the names of the Java method calls are the same as the C APIs and take the same parameters.
We will use a Library for the RTL-SDR because configuring it is complex. The library is based on the work of many others who figured out how to setup the RTL as an SDR. I have used a Java port of librtlsdr that Denny Sheirer made for Sdr Trunk. I've modified it slightly to fit this tutorial and called it rtlsdr4java. Download the jar file. Make sure it is included as a jar file in your class path or include the source files in your project. It is dependent on usb4java and usb4java-javax. Those should both already be in your class path from the previous step.
The library expects a valid USB Device and Descriptor to be passed to it. It will then open the USB Device and communicate with it. The flow works this way because it is common to get the list of USB devices outside of the library so that the user can pick the device they want to use in the GUI. There is no need to open and lock the devices in that process. Once the user has chosen a device, we can pass it to the library and begin processing. We will add that flow to the findDevice() method, so that the UsbDevice it returns is wrapping an RTL-SDR device.
The modified code is below. Once we have found the device we call a method to work out the tuner type. This also has some code to reset the device if that is needed. So it is useful to always run it. Then we call the constructor for the R820TTunerController, passing it the device and its descriptor. After that we have to call init(sampleRate) on that device, which opens it, sets the sample rate and returns the created device to the calling method. The library requires SampleRate to be a Java Enum. We call a static method to get the rate we want. You can inspect the values of SampleRate If anything goes wrong the library will throw a DeviceException. In a real program it will be important to catch those exceptions and give informative notices to the user.
R820TTunerController rtl;

...

	public UsbDevice(short vendorId, short productId, int sampleRate) throws DeviceException {
		// Initialize the default context
		int result = LibUsb.init(null);
		if (result != LibUsb.SUCCESS) throw new LibUsbException("Unable to initialize libusb.", result);

		rtl = findDevice(vendorId, productId, sampleRate);
		if (rtl == null) throw new DeviceException("RTL not available,  is it plugged in?  Does it have the updated drivers?");
	}

	...

	R820TTunerController findDevice(short vendorId, short productId, int sampleRate) throws DeviceException {

		// Read the USB device list
		DeviceList list = new DeviceList();
		int result = LibUsb.getDeviceList(null, list);
		if (result < 0) throw new LibUsbException("Unable to get device list", result);

		try {
			// Iterate over all devices and scan for the right one
			for (Device device: list) {
				DeviceDescriptor descriptor = new DeviceDescriptor();

				result = LibUsb.getDeviceDescriptor(device, descriptor);
				if (result != LibUsb.SUCCESS) throw new LibUsbException("Unable to read device descriptor", result);
				if (descriptor.idVendor() == vendorId && descriptor.idProduct() == productId) {
					System.out.println(descriptor);
					this.device = device;
					this.deviceDescriptor = descriptor;
					TunerType tunerType = TunerType.UNKNOWN;
					tunerType = RTL2832TunerController.identifyTunerType( device );
					System.out.println("Found tuner: " + tunerType);
					rtl = new R820TTunerController(device, descriptor);
					SampleRate rate = SampleRate.getClosest(sampleRate);
					rtl.init(rate); // have to call this after the constructor as the shadowRegister needs to be init
					return rtl;
				}
			}
		}
		finally {
			// Ensure the allocated device list is freed
			// Note don't free the list before we have opened the device that we want, otherwise it fails
			LibUsb.freeDeviceList(list, true);
		}
		return null;
	}

	...
Set the sample rate to 240000 for now. That is close to the 192000 rate that we have been using in previous tutorials. For reference, the valid sample rates in the Java enum are:
		RATE_0_240MHZ( 0x1E00,  240000, "0.240 MHz" ),
		RATE_0_288MHZ( 0x1900,  288000, "0.288 MHz" ),
		RATE_0_960MHZ( 0x0780,  960000, "0.960 MHz" ),
		RATE_1_200MHZ( 0x0600, 1200000, "1.200 MHz" ),
		RATE_1_440MHZ( 0x0500, 1440000, "1.440 MHz" ),
		RATE_1_920MHZ( 0x03C0, 2016000, "2.016 MHz" ),
		RATE_2_304MHZ( 0x0320, 2208000, "2.208 MHz" ),
		RATE_2_400MHZ( 0x0300, 2400000, "2.400 MHz" ),
		RATE_2_880MHZ( 0x0280, 2880000, "2.880 MHz" );
If you run this from the test main() method it should print out:
Tuner:RAFAELMICRO_R820T
Now it gets exciting. Let's try to read some data from the device. To do that we need to pass the R820TunerController a class that adheres to the Listener interface and is ready to process a ComplexBuffer (which is just an array of floats). It is a "callback". We setup a method that will handle the data when it is called. The Listener interface requires a method called receive() for that purpose. You pass the class to the R820TunerController by calling the setListener() method. It will then call the receive method each time a buffer full of IQ samples is ready.
First we define the Listener. We will call it an RtlSource because we will make it fit in with our other IQ Sources, the WavFile and the SoundCard, as defined in Tutorial 8. For now let's just print out that we have received the samples. I put RtlSource in the audio package and gave it this definition:
public class RtlSource implements Listener<ComplexBuffer> {

	@Override
	public void receive(ComplexBuffer t) {
		float[] IQbuffer = t.getSamples();
		System.out.println("Got samples:" + IQbuffer.length);
	}
}
I then added a method to UsbDevice that will pass the listener to the R820TunerController.
	public void addListener(Listener<ComplexBuffer> listener) {
		rtl.addListener(listener);
	}
To test this, let's add a couple of lines to our main() method. After opening the UsbDevice we will create and pass the Listener, then we will wait in a loop forever. Just for testing.
	public static void main(String[] args) throws DeviceException, LineUnavailableException {
		int sampleRate = 240000;
		UsbDevice usb = new UsbDevice( (short)0x0bda,(short)0x2838, sampleRate);

		RtlSource rtlDataListener = new RtlSource();
		usb.addListener(rtlDataListener);

		while(true)
			;
		//usb.exit();
	}
When we run this the RTL source is opened, it starts up in the background and begins calling the receive method on our Listener, which prints out:
Found tuner: RAFAELMICRO_R820T
Got samples 131072
Got samples 131072
Got samples 131072
Got samples 131072
Got samples 131072
Got samples 131072
...
To use those samples we need to do two at least two things:
In this section we are going to setup the RTL-SDR with the GUI. If you get errors when you try to stop and start the device, then it is because we are not cleanly shutting it down. Un-plug and re-plug the device if necessary, or see the modification I made to the MainWindow class to catch the shutdown event and call a method to exit the device
If we update our RtlSource to extend Source (which we defined in Tutorial 8) then we will be able to store the samples in a Circular buffer. Then we can read the IQ samples from the buffer and process them without further changes. It will look just like a WavFile or a Soundcard. Our minimal implementation looks like the below. And once you are bored of seeing "Got samples" printed out, you can comment out that line.
public class RtlSource extends Source implements Listener<ComplexBuffer> {

	public RtlSource(int bufferSize) {
		super(bufferSize);
	}

	@Override
	public void receive(ComplexBuffer t) {
		float[] IQbuffer = t.getSamples();
		for (float f : IQbuffer) {
			buffer.add(f);
		}
		System.out.println("Got samples:" + IQbuffer.length);
	}

	@Override
	public void run() {
		// We don't need a run method as this is called from the RTL-SDR which is already a seperate thread
	}
Then we will add this to the processing loop of the Sdr class (also from Tutorial 8. We replace the line that sets up the WavFile or SoundCard source with the following. This opens the RTL-SDR, creates a listener and adds the listener to the RTL-SDR:
	UsbDevice usb = new UsbDevice( (short)0x0bda,(short)0x2838, sampleRate);
	Source soundCard = new RtlSource(sampleRate);
	usb.addListener((RtlSource)soundCard); // we need to cast soundCard to RtlSource because that is a Listner.  Source is not.
With a sample rate of 240000, you will need to make sure that the decimation rate is 5, vs 4. So that we end up with 48000 samples per second audio. Which brings up a tricky operation. We have defined buffer lengths and other things to fit the decimation that we are using. So now is the time to bite the bullet and define a decimation rate in terms of the sample rate, and use that to setup all the buffers and processing. I will be honest to admit that when I did that it took me several iterations to get all of the lengths right without errors. I called the decimation rate R and I calculate R as soon as the class constructor is called, like this:
	R = sampleRate / AF_SAMPLE_RATE;
	System.out.println("Decimation by: " + R);
Where AF_SAMPLE_RATE is defined as 48000.
The key things to change are the length of the audio buffer (now sampleLength/R), when the decimation happens (now when decimateCount == R vs when it equalled 4) and the position in the audio buffer when we write a sample (now d/R).
I ran this and got a flat FFT filled with noise, which is promising, but I also get an error message printed over and over:
error duing rtl2832 buffer dispatcher run Attempt to Write past the read pointer
That means the circular buffer is too small and given I paid no attention to it, that is not surprising. I set the buffer size to sampleRate * 5 and it ran without printing an error. Or so I thought. See later in this tutorial for more difficulties with this.
We can set the center frequency by calling setTunedFrequency() and passing in a long for the frequency in Hz. We can add a method to UsbDevice that passes the call through to the RTL-SDR like this:
	public void setTunedFrequency( long frequency ) throws DeviceException {
		rtl.setTunedFrequency(frequency);
	}
Add a call in the Sdr.processing() method to call usb.setTunedFrequency(centerFrequency) when we start up. I passed the centerFrequency into the Sdr from the main() method and stored it in a class variable. Then the GUI can access it and display the right frequencies on the FFT. In previous tutorials the GUI just displayed a hard coded center frequency. I changed that in MainWindow to be sdr.centerFrequency and then it displays the frequency that we set in the sdr. Note that this is still a quick hack. In a real application we want to be able to change the frequency in the GUI and then pass it through to the running SDR, but that will have to wait for another time.
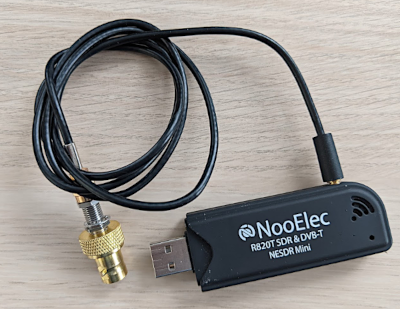
The RTL has a minimum frequency of about 32MHz, so we can't test this on the HF bands like we did before. Let's see if we can hear a local amateur radio station. I set the center frequency to 145980000. That is in the 2 meter amateur band. I plugged the RTL into my 2 meter antenna using a patch cable and could see some activity.
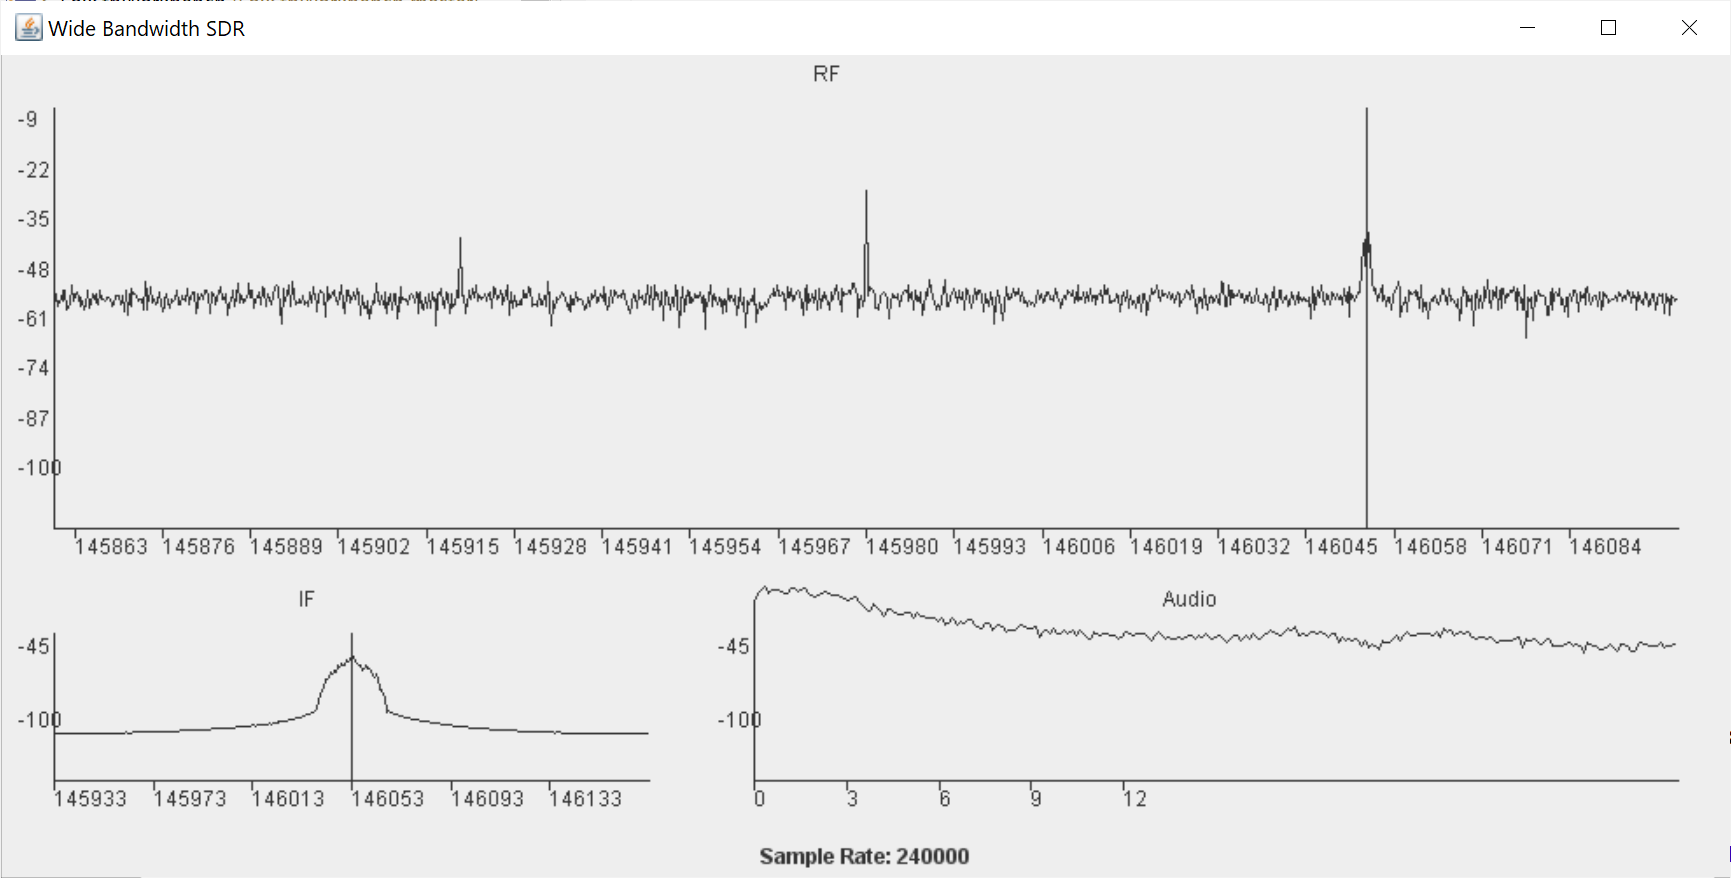
But this is FM modulation, and we can't yet decode that yet! I will do a separate tutorial on decoding FM, so for now I grabbed an FmDemodulator class that I wrote for FoxTelem and used it. You can use it instead of the side band decode. Make sure that you do not accidently apply the hilbert transform and delay. Just pass the I and Q values to the FmDemodulator. In fact I defined a Java Enum for the types of demodulation and made a method to demodulate each flavor. If you want to do that then add these class variables at the start:
	enum Mode {
		AM,
		LSB,
		USB,
		FM
	}
	Mode mode = Mode.FM;
	FmDemodulator fm = new FmDemodulator();
	HilbertTransform ht;
	Delay delay;
Then put this new method at the end.
	double demodulate(double audioI, double audioQ) {
		//Demodulate ssb
		if (mode == Mode.LSB || mode == mode.USB) {
			audioQ = ht.filter(audioQ);
			audioI = delay.filter(audioI);
		}
		double audio = 0;
		if (mode == Mode.USB)
			audio = audioI - audioQ; // USB
		else if (mode == Mode.LSB)
			audio = audioI + audioQ; // LSB
		else if (mode == Mode.AM)
			audio = Math.sqrt(audioI*audioI + audioQ*audioQ);
		else if (mode == Mode.FM)
			audio = fm.demodulate(audioI, audioQ);
		audio = audio * gain;
		double fil = audioLowPass.filter(audio);
		return fil;
	}
And call it from the processing loop like this:
double fil = demodulate(audioI, audioQ);I made these modification but I had to fiddle with the gain value. It needed to be much less for FM. In fact I set it to 0.05 rather than 5. In a real application we would need some sort of Automatic Gain Control (AGC).
With that done I was able to click on a signal in the band and hear people chatting away in French on a local repeater! Two VE2 stations in the local area as I am in Quebec. Fantastic!
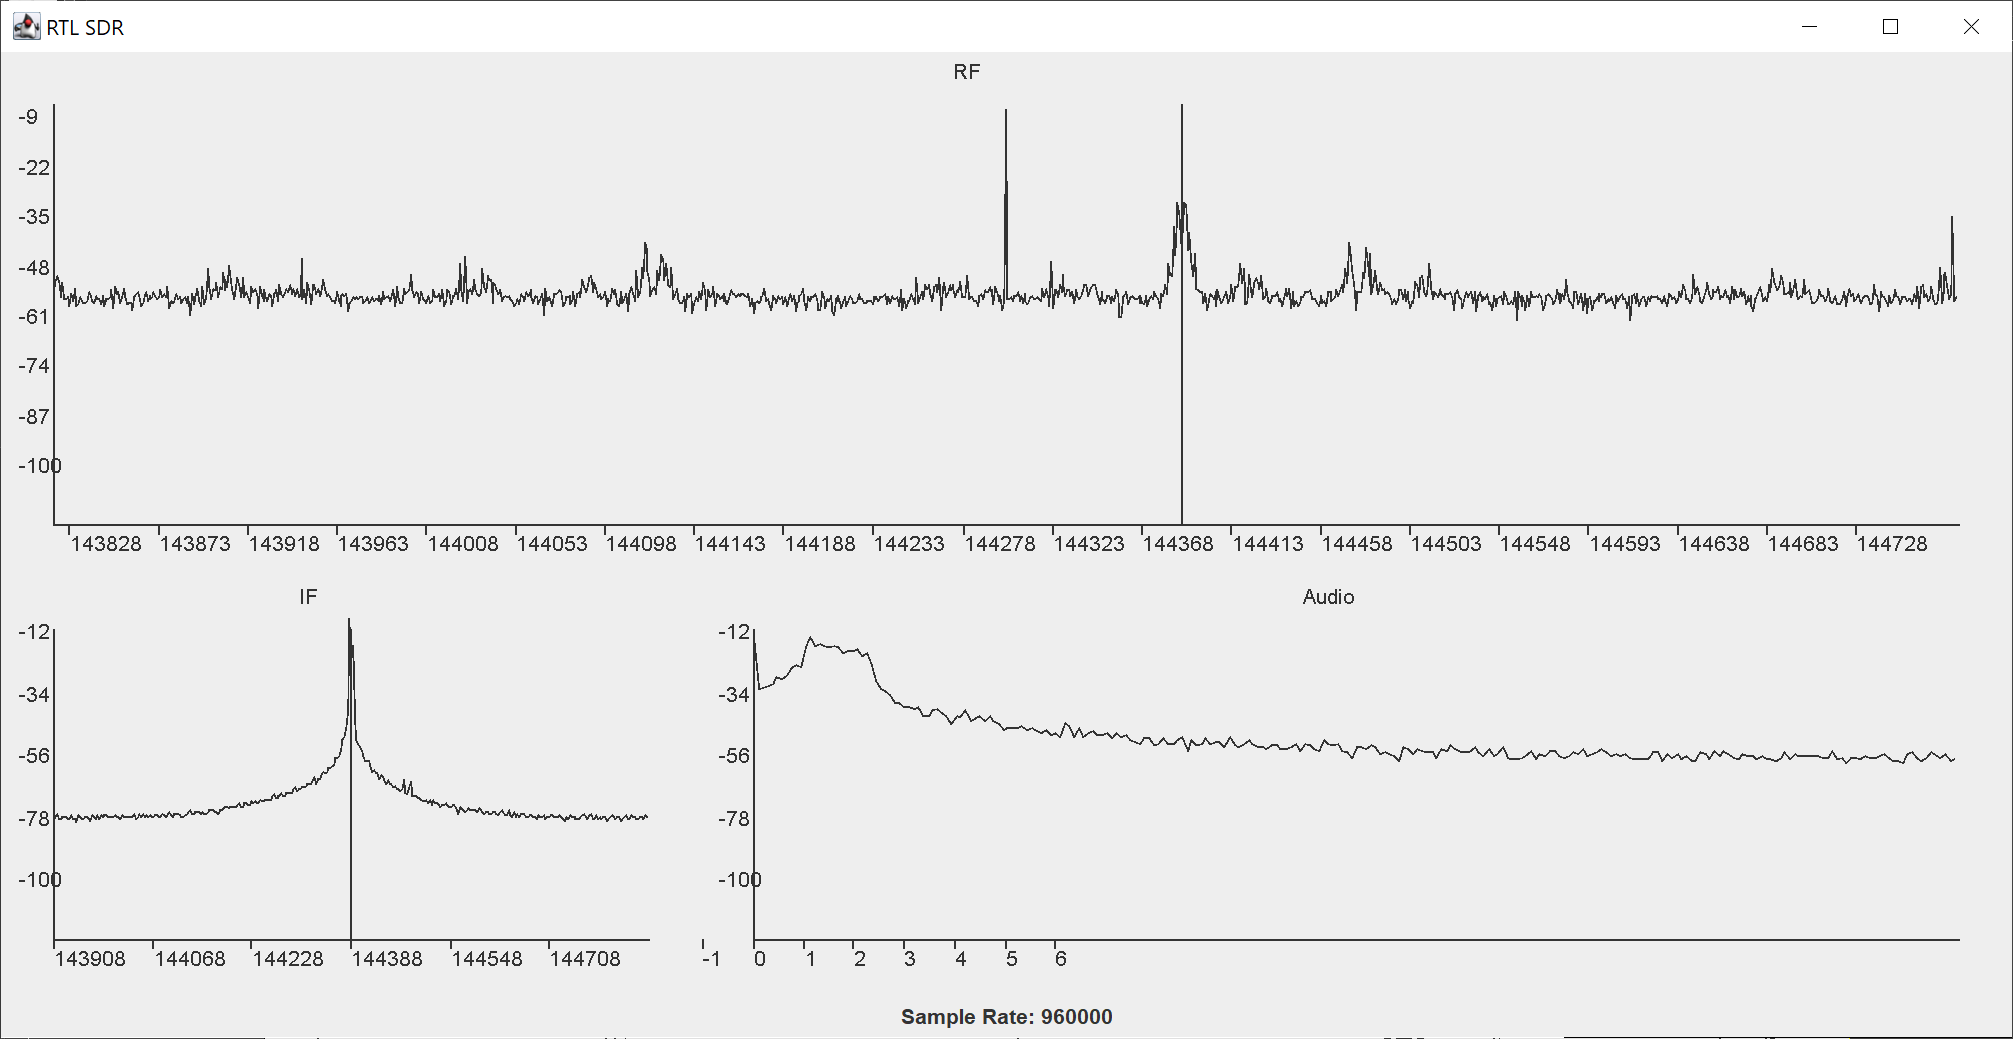
I next set the sampleRate to 960000, almost a megahertz of bandwidth. We keep the sample rate a multiple of 48000 to make decimation easier.
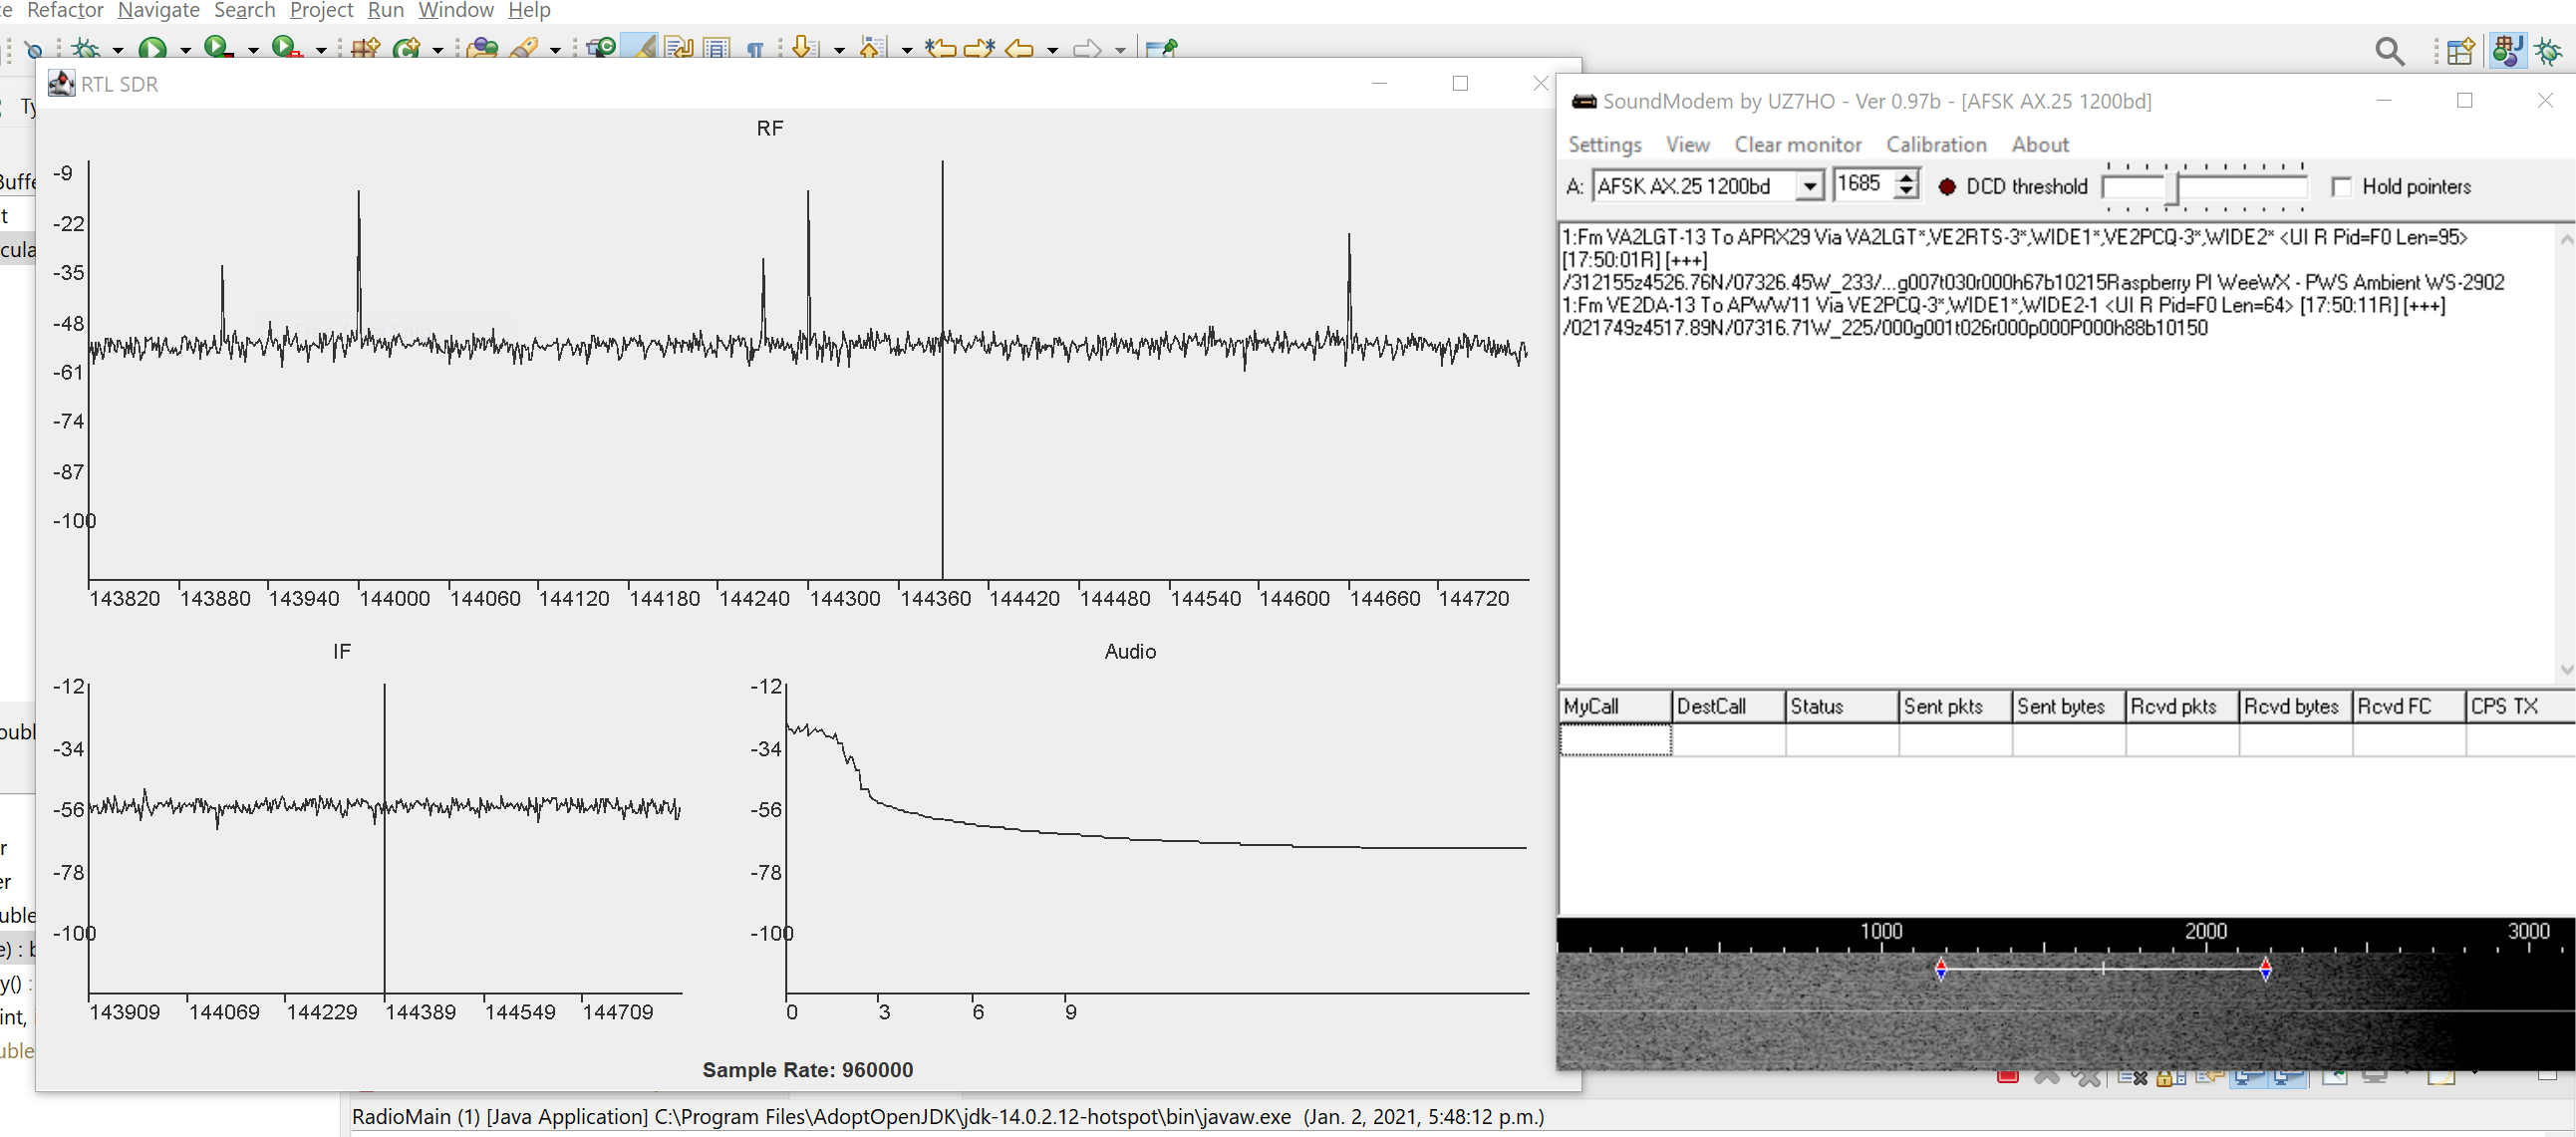
To test I tuned to 144.390MHz because that is the packet radio frequency in North America and there is a transmission every few seconds. Or rather, I set the center frequency to 144300000, which is just to the side of 144.390MHz. I clicked on the signal and it sounded about right. If you are not sure what packet sounds like, then here is an example recorded from my version of this program.
A quick check of Task Manager shows that my computer is working really hard, with 30% of the CPU being used.
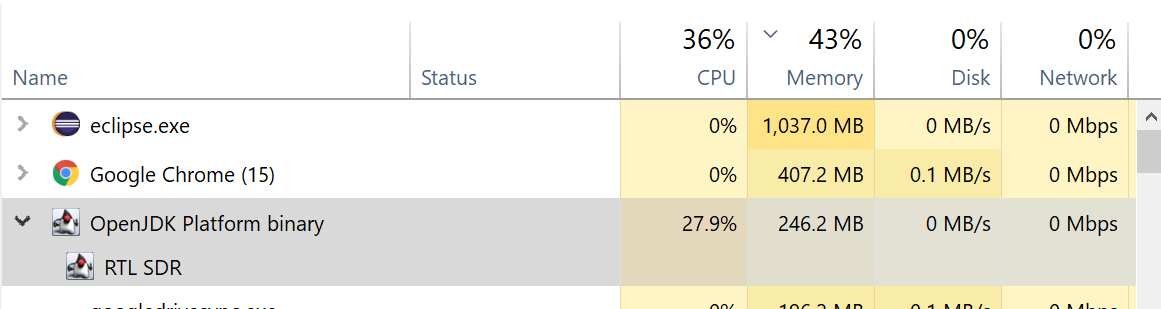
This is to be expected given the volume of data we are processing. It's time to use the PolyPhase filtering from Tutorial P. In fact I decided to use a boolean called ppFilter in the Sdr class, that allows me to swap back and forward between Polyphase filtering and filtering with FIR Raised Cosine filters. I love this type of AB testing to see if things are working as expected. The two routines side by side look like this:
		if (!ppFilter) {
			//Filter pre decimation
			audioI = lowPassI.filter(IFbuffer[2*d]);
			audioQ = lowPassQ.filter(IFbuffer[2*d+1]);
			// show the IF (otherwise we see the rotated spectrum)
			IFbuffer[2*d] = audioI;
			IFbuffer[2*d+1] = audioQ;

			//Decimate
			decimateCount++;
			if (decimateCount == R) {
				decimateCount = 1;
				double fil = demodulate(audioI, audioQ);
				audioBuffer[d/R] = fil;
			}
		} else {
			inI[decimateCount] = IFbuffer[2*d];
			inQ[decimateCount++] = IFbuffer[2*d+1];
			if (decimateCount == R) {
				decimateCount = 0;
				audioI = polyPhaseFilterI.filter(inI);
				audioQ = polyPhaseFilterQ.filter(inQ);

				double fil = demodulate(audioI, audioQ);
				audioBuffer[d/R] = fil;
			}
		}
I kept the filter width at 12kHz in both cases. I ran the Polyphase version and checked the CPU usage:

Much better! We have cut the CPU usage by 3. But does it work? Maybe we have just mangled the information..
Packet radio is quite fussy. If a packet is corrupted then it does not decode. There is no forward error correction, just a checksum. It's an old protocol that is suitable for clear noise free channels, but not much else. For our purposes it will make a good test. If we can decode it, then our radio is working.
I used a Virtual Audio Cable to feed the audio into SoundModem. If you don't have a virtual cable then download one. I use VAC but you need the paid version. The demo version will not work because there is a spoken message in the playback. I think there are other free cables available and on Linux I understand you do not need a cable. Alternatively feed the audio out of your soundcard and back into the microphone with an actual cable. Or record it on another device and play back the file into the soundcard.
I configured soundmodem to decode AFSK AX.25 1200bd. Which is audio frequency shift keying at 1200 baud. AFSK means the tones are transmitted as audio in the FM channel where as FSK is just wiggling the frequency directly to transmit the data. With a bit of patience I was able to decoded some of the packets. And then after some playing with the levels I was able to get it to decode almost every packet. So it seems to work well!
A couple of thoughts to end this. Firstly you probably get errors when you stop and restart the SDR. We need to cleanly shutdown the SDR. I have included an example in the MainWindow class to catch the close message from the JFrame and shut things down. Secondly we have not changed any of the gain settings. But that can wait for the next tutorial where we will experiment with the RTL-SDR further.
Prev Tutorial | Index | Next Tutorial
Enter Comments Here:
| On: 01/28/21 11:11 Hicham said: |
| I am Glade that you're back again with your amazing tutorials, I have been fallowing this tutorials for a while, great work, keep going. Thank you very much. Hicham. |
Copyright 2001-2021 Chris Thompson
Send me an email