
The files for this tutorial are available on github.com/ac2cz/SDR
We have been building up to something that can support a wider bandwidth. We want to implement a new source that can read data from an RTL SDR and see if we can process it. Before we do that, we need to refactor our code to make things more efficient. Otherwise it will just grind to a halt. So this tutorial is about architecture, threads and parallel processing. The next tutorial will dig into the RTL SDR.
Our architecture diagram in Tutorial 7 does not show any buffers. These are important to help decouple our application. In the approach we have taken so far, every chunk of samples read from the source needs to be fully processed by the downstream algorithms before we can read another sample. That can easily result in dropped samples from the SDR. Which can be very problematic for digital signals and annoying when listening to audio.
Let's consider a revised architecture that introduces buffering and makes it clearer how the GUI will interact with the processing flow:
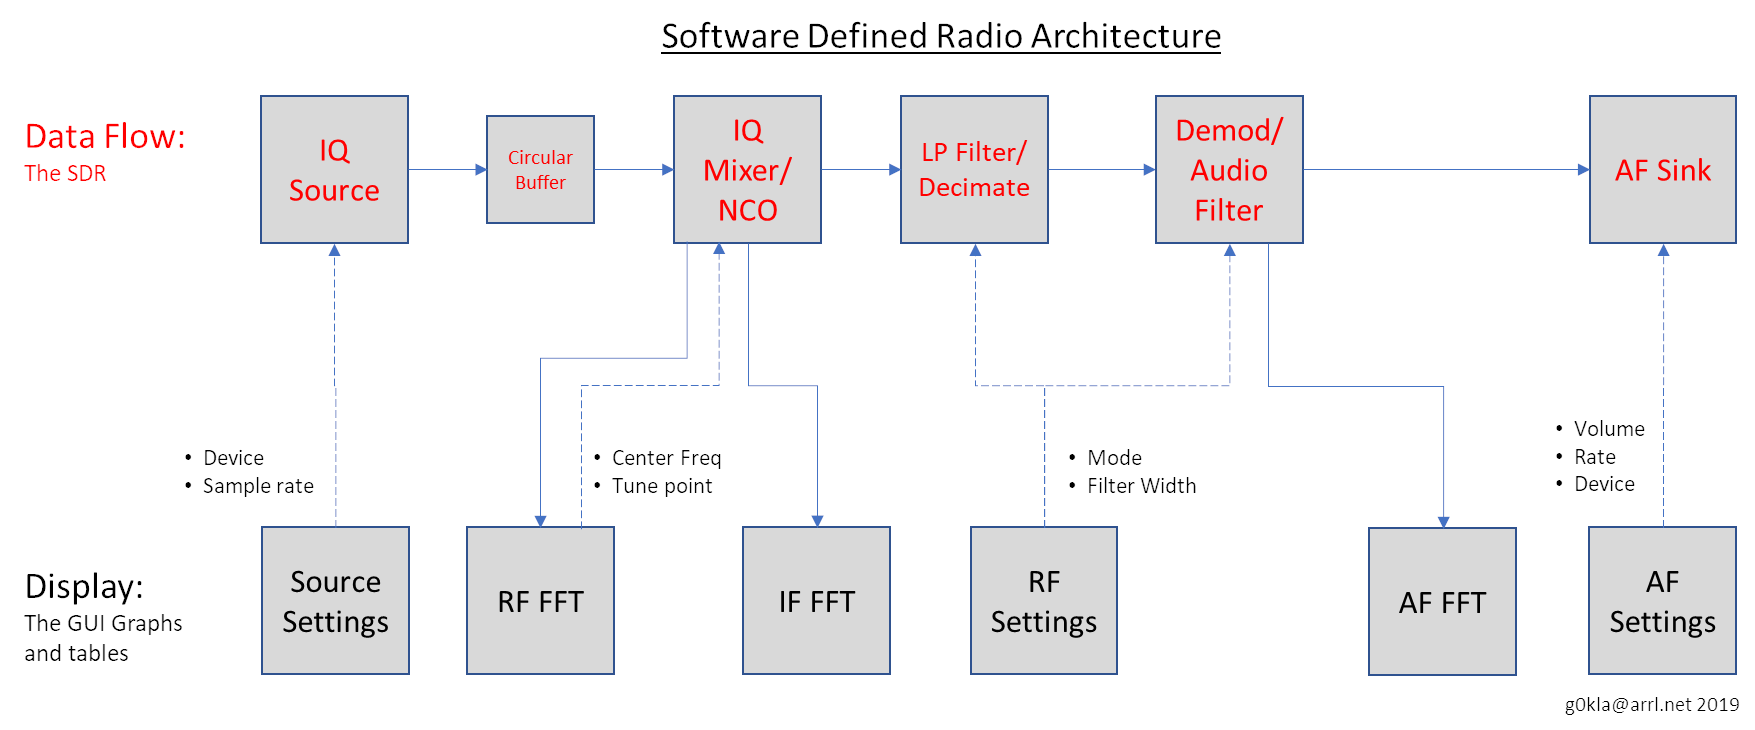
This looks like a lot, but there are only a couple of new ideas.
The first new idea is a clarification of the GUI. The dotted lines show how the GUI controls the SDR. The solid lines show the flows of data. But now we can have the situation where the GUI reads from the SDR when it wants to, rather than the SDR publishing data to the GUI as fast as it can. The SDR should not care about the GUI at all and the GUI should not slow down the SDR. If we want the FFT to update only 10 times per second, to save CPU, then this allows us to do that.
Secondly we introduce the concept of a Circular Buffer. This can store data from a source with no delay. It is written immediately. The source can continue processing without caring how the data is processed. The buffer is circular, meaning once it is full it starts overwriting itself from the beginning. This means that it never fills up. It is a temporary storage space. Downstream processes can work at their leisure, but if they are too slow then data will be lost. This is usually sufficient to cope with temporary delays in downstream processing such as memory allocations or user settings changes.
This new architecture will require multiple threads so that different parts of the radio can run at different speeds. The GUI runs in its own thread already and we don't need to do anything additional. In Java it is called the Event Dispatch Thread (EDT). We will split the SDR into three threads as follows:
It's pretty common to move things around and tidy them up as you write more code. It becomes obvious later that things can be shared or named better or put in a different class. Modern IDEs like Eclipse make this relatively simple. To start with we make a new package called "gui". Mine is named tutorial8.gui because I have separated each tutorial into a separate package. In Eclipse you can then drag and drop the MainWindow.java class from the default package to gui and Eclipse will rename all the imports and references to it. If you are not using Eclipse then you have to do that manually. Move it and rename any references you remember. Then compile it and fix any compile errors until it works again.
Next let's deconstruct our main method. The guts of the radio should not be here. So we create a new class called Sdr that will hold the main processing loop, launch the necessary threads and store the results. The results can then be displayed in the gui as we see fit, but we will no longer tightly link the two. We won't need to update the gui every time we pull a buffer from the source, for example. The GUI can update on whatever schedule it wants. This will drastically reduce the amount of processing we are doing for a large bandwidth SDR.
The Sdr class starts with some initialization and then a processing loop that is almost a direct copy of the code from the main loop of Tutorial 7. But rather than calling the MainWindow to display the results, we simply store the results so they can be queried. For now we will just make them public arrays, but we may need some sort of synchronization in the future to prevent partial data being read and displayed.
public class Sdr {

	public int sampleRate = 0;
	public int sampleLength = 4096;
	public double[] IQbuffer;
	public double[] IFbuffer;
	public double[] audioBuffer;
	public ComplexOscillator localOsc;

	public Sdr(int sampleRate, int sampleLength) {
		this.sampleRate = sampleRate;
		this.sampleLength = sampleLength;
		IQbuffer = new double[sampleLength*2];
		audioBuffer = new double[sampleLength/4]; // just one mono channel, decimated by 4
		IFbuffer = new double[sampleLength*2];
		localOsc = new ComplexOscillator(sampleRate, 0);
	}

	public void processing() throws UnsupportedAudioFileException, IOException, LineUnavailableException {
		int sampleRate = 192000;
		WavFile soundCard = new WavFile("ecars_net_7255_HDSDR_20180225_174354Z_7255kHz_RF.wav", sampleLength, true);
//		SoundCard soundCard = new SoundCard(sampleRate, FFT_LENGTH, true);
		AudioSink sink = new AudioSink(sampleRate/4);

		...
	}
}
Our main method is then refactored to create the SDR and launch the GUI. For now we don't do anything with the exceptions that are generated. They just print out the stack trace. Note that we "pass" the SDR to the MainWindow. This may feel like we are passing a lot of data, but of course it is just a reference to the running instance of the SDR. It allows the GUI to access the data. In Microsoft windows parlance we pass it a "handle" to the data.
public class RadioMain {

	public static void main(String[] args) {
		int sampleRate = 192000;
		int FFT_LENGTH = 4096;

		Sdr sdr = new Sdr(sampleRate, FFT_LENGTH);
		MainWindow window = new MainWindow("SDR with Circular Buffer", sdr);

		try {
			sdr.processing();
		} catch (UnsupportedAudioFileException e) {
			e.printStackTrace();
		} catch (IOException e) {
			e.printStackTrace();
		} catch (LineUnavailableException e) {
			e.printStackTrace();
		}

	}
}
The MainWindow class needs to be updated to reflect these changes. We pass in the SDR and that allows a reference to the NCO to be passed down to the FFT Window. We then need to set up the GUI to periodically read data from the SDR and display it. In a fully fledged SDR we might have each individual component poll the SDR. For example the RF FFT might poll 60 times per second, but an AF FFT might be set to update more slowly. In this case we will put the update in one place by making MainWindow a Runnable class. This allows us to launch it as a thread. So let's talk a bit about how threads work. If you're a concurrency expert then feel free to skip this section.
As a quick aside, any class can be turned into a separate Thread in Java. In fact the whole class does not run as a Thread, just the part of the class that you put in the "run()" method. But it can reference the data and other methods of the class. This is quite useful.
We add the keywords "implements Runnable" to the class definition. Runnable is just an Interface and requires us to define a method called run().
public class MainWindow extends JFrame implements Runnable {We create a fairly simple run method that pauses so that it executes about 30 times per second. It then copies the data from the SDR into some local arrays so that it can display the results. Then we display it, but because we are updating the GUI from another thread we use a special call to the EventQueue that asks it in a nice way to please update the GUI when you have time. This is not 100% necessary but it prevents issues that can happen (and are hard to debug) when the Event Dispatch Thread is updated from a parallel thread.
public void run() {
		Thread.currentThread().setName("MainWindow");

		IQbuffer = new double[sdr.IQbuffer.length];
		IFbuffer = new double[sdr.IFbuffer.length];
		audioBuffer = new double[sdr.audioBuffer.length];

		// Runs until we exit
		while(true) {
			// Sleep first to avoid race conditions at start up
			try {
				Thread.sleep(1000/30); // Delay in milliseconds - about 30 times per second
			} catch (InterruptedException e) {
				e.printStackTrace();
			}
			if (sdr.IQbuffer != null) {
				System.arraycopy(sdr.IQbuffer, 0, IQbuffer, 0, sdr.IQbuffer.length);;
				System.arraycopy(sdr.IFbuffer, 0, IFbuffer, 0, sdr.IFbuffer.length);;
				System.arraycopy(sdr.audioBuffer, 0, audioBuffer, 0, sdr.audioBuffer.length);;
				EventQueue.invokeLater(new Runnable() {
					public void run() {
						rfFftPanel.setData(IQbuffer);
						rfFftPanel2.setData(IFbuffer);
						audioFftPanel.setData(audioBuffer);
					}
				});
			}
		}
	}
Launching a Thread that is defined as Runnable is done by wrapping it in a Thread instance. So in the constructor for MainWindow we create a Thread called windowRefresh that wraps the mainWindow class. Which can refer to the current class as "this". Then we call "start()" on the thread, which calls run(). The Thread will run for as long as the run() method executes and will run in parallel with the code that just launched it.
		Thread windowRefresh = new Thread(this);
		windowRefresh.start();
We can test this straight away. It should run in almost the same way as the previous Tutorial. You can then go into the MainWindow class and change the delay in the refresh loop. Try 1000/10, which will give 1/10 of a second delay. Or try 60 refreshes per second.
A circular buffer is illustrated below and is very common in audio applications. It is a buffer with a write pointer (or head, or position) and a read pointer. It is implemented as an array with two pointers. As we write to the array we increment the write pointer. When we get to the end of the array we simply wrap around and start writing from the beginning. The read pointer operates the same way. If we want we can throw errors if the write pointer passes the read pointer. Or we can pause execution and wait for data to be drained. This is useful if we are processing from a saved WAV file for instance, where the data is sourced much faster than it can be processed.
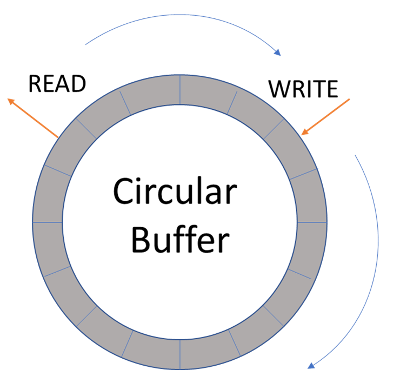
You will sometimes see very simple implementations of a circular buffer with an array and an index. Every time an item is written we update the index and modulo it with the bufferSize, causing it to wrap. We will implement the circular buffer in a new class because we want to handle wrapping of the pointers and we want to be able to reuse it for all our source types, e.g. Wavfile, SoundCard. At the core this is just an array of doubles, so we create a class and a constructor that initializes the array.
double[] doubles;
	int writePointer = 0;
	int readPointer = 0;

	public CircularDoubleBuffer(int size) {
		doubles = new double[size];
		System.out.println("Created circular Double buffer with " + doubles.length + " doubles");
	}

}
We want to be able to read and write to the buffer and for the data to wrap around when we get to the end. The first thing we have to be careful of is what happens when the read pointer catches up with the write pointer. Intuitively we should wait until there is more data. That is a blocking read and that feels like a function of a source rather than a buffer. So instead we can return an exception to indicate that no data is available, which would force the calling function to decide what to do. We can also provide a function that tells the calling function how much data is available, called size(). Then we can delay a read until sufficient data is available.
The second considerations, is what to do if the write pointer catches up with the read pointer. Now we are overwriting data that has not yet been read. Again we have two choices. We can just write the data, as long as we push the read pointer along with us, or we can return an error to the calling function and allow it to decide what to do. It can throw the data away or wait. If we are processing from a file, for example, we can wait. No data will be lost. Maybe we are running a really deep search for a signal and the reads are slow. If the data is recorded we don't care. If the data is arriving real time then we probably want to throw it away and carry on.
So let's add a function that copes with wrapping the pointers, called incPointer() and two functions to add and read data. For now we will throw errors when the pointers wrap.
	private int incPointer(int pointer, int amount) {
		int p = pointer + amount;
		if (p >= doubles.length) {
			// We need to wrap around the array
			p = p % doubles.length;
		}
		return p;
	}

	/**
	 * Add data at the write pointer.  This only changes the write pointer and throws an error if it reaches the read pointer
	 * @param d
	 * @return
	 */
	public boolean add(double d) {
		int p = incPointer(writePointer, 1);
		if (p == readPointer)
			throw new IndexOutOfBoundsException("Attempt to Write past the read pointer");
		doubles[writePointer] = d; // we write to the write pointer
		writePointer = p;  // Increment so we are ready to write next time
		return true;
	}

	/**
	 * Read a double from the read pointer. It can't equal the write pointer because data has not yet been written there.
	 * The pointer needs to be incremented after the read.
	 * @return
	 */
	public double read() {
		if (readPointer == writePointer)
			throw new IndexOutOfBoundsException("Attempt to read past write pointer");
		double d = doubles[readPointer];
		int p = incPointer(readPointer, 1);
		readPointer = p;
		return d;
	}
This is a good time to talk about testing. When you create a core class like this, it is imperative that it works correctly, even in narrow cases where a single value might be lost. It is too difficult to test this class with the rest of the SDR. We should create a small test routine to make sure that it works. You can do that by adding a main method to the bottom of the class, together with some code to test it. An even better approach is to use a JUnit test. In the Eclipse IDE I can add a JUnit test by right clicking on the class in the list on the left and picking New > JUnit Test Case. That creates a framework class. I usually don't bother with the "setup before" and "tear down" methods. So I unselect those. If the new test class is added but then it seems to be missing the JUnit library (which always seems to happen to me) then go to the Project > Properties and edit the Java Build Path. On the Libraries tab click "Add Library" and pick JUnit.
Putting the tests in a JUnit allows you to automatically compare the results. This is helpful if you want to run the tests later to see if bug fixes have broken anything.
If you use a main() method or a JUnit, the tests are similar. Have a look at the tests that I wrote
With the core buffer working, we need to add two more methods. One called getCapacity() will tell us if we have space to write a chunk of data, the other called size() will tell us how much data is available for reading. Both measure the distance between the two pointers.
	public int getCapacity() { // how many bytes can we add without the end pointer reaching the start pointer
		return doubles.length-size();
	}

	public int size() {
		int size = 0;
		int e = writePointer; // snapshot the end pointer to avoid a race condition in the checks below.  The size can only grow if the write pointer moves, so this is safe
		if (e >= readPointer)
			size = e - readPointer;
		else {
			size = doubles.length - readPointer; // distance from start to end of the real array
			size = size + e;  //  add the distance from the start to the write pointer
		}
		return size;
}Source only has three methods and is presented in full below:
public abstract class Source implements Runnable {
	CircularDoubleBuffer buffer;
	boolean running = true;

	protected Source(int bufferSize) {
		buffer = new CircularDoubleBuffer(bufferSize);
	}

	public void fillBuffer(byte[] readBuffer, boolean stereo) {
		int step = 4;
		if (stereo) step = 2;

		for (int i = 0; i < readBuffer.length/step; i++) {// 4 bytes for each sample. 2 in each stereo channel.
			byte[] ab = {readBuffer[step*i],readBuffer[step*i+1]};
			double value =  Tools.littleEndian2(ab,16);
			value = value /32768.0;
			buffer.add(value);
		}
	}

	public int read(double[] readBuffer) {
		int doublesRead = 0;

		// We block until we have read readBuffer length bytes, assuming we are still running
		while (running && doublesRead < readBuffer.length) { // 2 bytes for each sample
			if (buffer.size() > 2) {// if we have at least one set of bytes, then read them
				try {
					readBuffer[doublesRead] = buffer.read();
					doublesRead+=1;
				} catch (IndexOutOfBoundsException e) {
					// If this happens, we are in an unusual situation.  We waited until the circularBuffer contains readBuffer.length of data
					// then we started to read it one byte at a time.  However, we have moved the read (start) pointer as far as the end
					// pointer, so we have run out of data.
					e.printStackTrace();
				}
			} else {
				try {
					Thread.sleep(0, 1); } catch (InterruptedException e) { e.printStackTrace(); }
			}
		}
		return doublesRead;
	}

	protected void stop() {
		running = false;
	}
The source holds the circular buffer. Note that I didn't extend the CircularBuffer. I could have and the code would have worked, but then we expose the public methods for the CircularBuffer outside of Source and that is not what we want. We want control over how data is added and removed from the buffer. We don't want to accidentally add data to the buffer directly.
The Source implements Runnable, just as we did for MainWindow. It is also abstract. That means you can not create a Source directly. You need a class that extends it and that class will be forced to implement a run method. That means WavFile and SoundCard will need a run method. They will be slightly different so we don't create a common one here in Source. We implement a method to fill the buffer and a read method that blocks until we have enough data in the buffer to read.
I will explain how to update the SoundCard class to extend this Source and then you can do the same for WavFile, which is simpler.
public class SoundCard extends Source {
	AudioFormat audioFormat;
	TargetDataLine targetDataLine;
	byte[] readBuffer;
	boolean stereo = false;
	int errorCount = 0;

	public static final int READ_BUFFER_SIZE = 1024;

	public SoundCard(int sampleRate, int buffersize, boolean stereo) throws LineUnavailableException {
		super(buffersize);
		readBuffer = new byte[READ_BUFFER_SIZE * 4];

	...
The SoundCard class extends the Source. This will require us to now implement a run method. The run method will be a simple loop that calls fillBuffer and continues until the running boolean is false. This is set to false by calling the stop method on Source. I call the stop method when close() is called for the SoundCard.
private void fillBuffer() throws LineUnavailableException {
		if (targetDataLine != null) {
			while (running && targetDataLine.available() < targetDataLine.getBufferSize()*0.5)
				try {
					Thread.sleep(0, 1);  // without this, the audio can be choppy
				} catch (InterruptedException e) {
					e.printStackTrace();
				}
			targetDataLine.read(readBuffer, 0, readBuffer.length);
			try {
				super.fillBuffer(readBuffer, stereo);
			} catch (IndexOutOfBoundsException e) {
			/*	 We get this error if the circularBuffer is not being emptied fast enough.  We are filling it by reading
				 data from the sound card as fast as it is available (real time).  The circularBuffer throws the IndexOutOfBounds
				 error from the add method only when end pointer had reached the start pointer.  This means the circularBuffer
				 is full and the next write would destroy data.  We choose to throw away this data rather than overwrite the
				 older data.  Is does not matter. We do not pop up a message to the user unless we accumulate a number of these issues
			*/
				errorCount++;
				if (errorCount % 10 == 0) {
					System.err.println("Missed audio from the sound card, Buffers missed: " + errorCount + " with capacity: " + buffer.getCapacity());
					if (errorCount % 100 == 0) {
						System.err.println("Cant keep up with audio from soundcard: " + e.getMessage());
					}

				}
			}
		}
	}

	public void close() {
		stop();
		targetDataLine.stop();
		targetDataLine.close();
	}

		public void run() {
		while (running) {
			try {
				fillBuffer();
			} catch (IndexOutOfBoundsException e) {
				System.err.println("No fill, buffer full");
				Thread.yield();
			} catch (LineUnavailableException e) {
				running = false;
				e.printStackTrace();
			}
		}
	}
With this new code we have an audio source that can read into a circular buffer. While this is not needed for a WavFile, we choose to implement it the same way for WavFile and SoundCards so that we can test with recordings. See the implementation for WavFile on GitHub
Our Sdr class just needs a small modification to use this new setup. In the processing loop make sure that WavFile and SoundCard are now declared as Sources like this:
		Source soundCard = new WavFile("ecars_net_7255_HDSDR_20180225_174354Z_7255kHz_RF.wav", sampleRate*2, true);
//		Source soundCard = new SoundCard(sampleRate, FFT_LENGTH, true);
Note that we no longer pass in the length of data that we want. We have decoupled the length of the FFT from the amount of data we read from the file and the amount of data we buffer. Instead we pass in the size of the buffer. This is best thought of in terms of the sampleRate. We get that many samples per second. If there are 2 doubles per sample and we want to buffer 1 second of data then samplesRate * 2 will work well.
Just before we start the audio processing loop, we need to start the Source thread. We create a new thread and pass it the soundCard. When we call start() on the soundCardThread it calls the run() method of soundCard. That starts filling the circular buffer in the background. In the audio processing loop we now pass in a reference to the array of data we want and then step through it. This processing is disconnected from the sound card reads and we already disconnected it from the GUI in MainWindow. So it should all run as fast as possible.
		Thread soundCardThread = new Thread(soundCard);
		soundCardThread.start();

		while (readingData) {
			soundCard.read(IQbuffer);
			if (IQbuffer != null) {
				for (int d=0; d < IQbuffer.length/2; d++) {
					//NCO Frequency
					Complex c = localOsc.nextSample();

					...
I tested the code with the ECARS file and it worked as expected. There is no need for a screen shot because it looks exactly the same as the previous tutorial. Making architecture changes like this are always easiest to test if we expect the same result. Then we can test side by side with Tutorial 7 to see if it works the same.
That is all of the architectural changes we need. Now we should be ready to process a wider SDR bandwidth from an RTL Dongle in the next tutorial.
Prev Tutorial | Index | Next Tutorial
Enter Comments Here:
| On: 05/24/19 13:13 Hicham said: |
| Exellent work, nice and clear explanations, keep going, thank you. |
| On: 05/26/19 14:14hicham said: |
| Are you planning to finish this serie tutorials, I can't wait to see more. |
| On: 05/28/19 13:13 Chris / G0KLA said: |
| Hi Hicham, Yes I hope to finish the tutorial. I just need to find some time in among the other things I am working on. I need to fix some bugs/issues with the Pacsat Ground station first, for example. Send my you email address if you want and I will notify you when the next Tutorial is up. My email is g0kla at arrl dot net |
| On: 05/29/19 8:08 Hicham said: |
| Hi Chris, my email is : ifrihicham@gmail.com (ifrihicham at gmail dot com). I am a student and I learned soo much from your SDR tutorials serie that's why I am so exited to see more of them. Great work. Thank you. |
| On: 11/22/20 12:12 Hicham said: |
| Great Tutorial as usual; Thanks for your time and effort. I can't wait to see more and more ... |
| On: 07/21/21 14:14 Claude KE6DXJ said: |
| Thanks again for the fascinating tutorials. Finally got through Tutorial 8 but would like to add a short note to clarify the approach to threading with a combination of Java application and Windows 10 operating system. I thought I was being clever and efficient using array copy when filling the CircularDoubleBuffer (CEB) from WavFile read rather than single buffer add. Ran into a problem filling the CDB to full write capacity. The Sdr read from the CDB processing could not keep up. Turns out that the AudioSink audioWrite processing is occasionally paused. The audio system processing has not been able to empty the previous audioWrite buffer when the next audioWrite buffer is presented. I verified this by checking the number of bytes avaiable to write before attempting to write the next audioWrite buffer resulting in the pause. I believe the less efficient single buffer add provided enough system overhead to prevent reaching full write capacity. This probably re-enforces the issues when running "realtime" software on a Windows desktop system. As my background is in low level realtime programming it is irritating. Thought this note might be helpful to someone's understanding of a threading detail. Let me know if this makes sense or not. |
| On: 07/22/21 8:08 Chris / G0KLA said: |
| Claude, great to hear that you finished the tutorial. Thanks for the thoughts on threads and real time operation. Hopefully it will help others. I agree that Windows does sometimes pause the audio writes. These are the sorts of challenges you need to deal with in a real time application. |
Copyright 2001-2021 Chris Thompson
Send me an email